Wednesday, October 27, 2010

Braces

Well, after a few months of Invisalign, then spacers, and now molar bands, it's time for full-on braces! Tomorrow I get brackets on all my little toofies. Fun times. 

What I'll look like tomorrow, from We Heart It

I'm preparing myself for lots and lots of soft foods. Bring on the polenta, oatmeal, hummus, applesauce, and juice. I also found this helpful list of soft vegan foods for people with braces. 

Wish me luck!

Friday, October 22, 2010

Tips for the Vegan Wino

When I first went vegan, the last thing I thought about was if my wine was vegan. I mean, how couldn't it be? It's made from grapes, right? People stomp on them in big vats like in I Love Lucy. Actually, I don't want to think about people's feet in my wine, either. Either way, I spent a long time drinking whatever wine I fancied and enjoying my ignorance. You can imagine my surprise when I made my very first trip to Barnivore. 

If you haven't heard (and I'm pretty sure you'd be hard pressed to find a vegan these days who hasn't), Barnivore is an online vegan alcohol directory that helps vegans find out if their favorite tipple is safe for consumption. As Barnivore explains, "brewmasters, winemakers, and distillers may include animal ingredients in their products directly, or they might use them in the processing and filtration." Non-vegan ingredients most often show up in the filtration process, when the wine is clarified after fermentation. As weird as it sounds, things like isinglass (from fish bladders), seashells, animal gelatins, and animal albumins (from egg albumin and dried blood powder) show up in these processes. I've been told that these ingredients don't normally show up in the final product, but that still doesn't make it vegan. And it certainly doesn't make me want to drink it. 


The Barnivore App


Luckily, Barnivore has made it easier than ever to access their vegan alcohol directory by creating two iPhone apps: "Is Your Wine Vegan?" and "Is Your Beer Vegan?" What's even cooler is that they're free! I was quick to download the wine version, as I'm a serious wine lover. I use it lots. 


Wines are listed as Vegan, Some [vegan] and Not [vegan]

Now, as you might imagine, there are thousands upon thousands of wines out there, and Barnivore can't possibly list them all. It is hard to navigate through the wine aisle of the grocery store searching label after label for one that matches what your little iPhone screen says is vegan. Luckily, there are a few really good staple wines out there that show up almost everywhere. A few of my favorites are Red Truck, FishEye, Smoking Loon, Charles Shaw Reds (aka Two Buck Chuck), and Yellow Tail Reds. And let's not forget some of the more luxurious favorites: Veuve Clicquot and Groth are both vegan, too. 


sad.
Sadly, an old favorite of mine, Root:1, is not vegan. But that's okay! There are tons of great options out there, and I've already made some new favorites. 


So next time you're about to enjoy an "adult beverage," as my dad calls it, check on Barnivore first. You can drink and be a responsible vegan at the same time! Oh, and obviously, please drink responsibly. 

Thursday, May 20, 2010

Vegan Scones, Choose Your Flavor!

Hello, all!


There is a new item available for purchase at Augusta Vegan Bakery: Vegan Scones! To be honest, I can't believe it's taken me so long to get around to offering scones on the site. They have always been a favorite pastry of mine, and they were one of the first things I taught myself to make. I remember the first successful batch of scones I made; they were non-vegan just like I was at the time, and they were delicious. I felt so accomplished. Now, I've veganized the recipe so I can share it with the world! These are so yummy, that it was very hard to take these pictures without devouring them first. Sounds silly, I know, but it's the truth.


Anyway, sorry for the shameless self-promotion, but I couldn't help it. Order some now, so I have an excuse to bake a big batch and sneak some for myself! Hope you are all enjoying the spring air!

Tuesday, April 27, 2010

Sunday Morning Mochi with Stir-Fried Veggies

For the past few months, my fiance and I have been following the advice of Alicia Silverstone's book, The Kind Diet. Silverstone discusses the benefits of plant-based diets in the book, outlining all of the wonderful perks that come with living the vegan lifestyle. Of course, my fiance and I didn't need any more convincing, but we did find some new information and inspiration that led us to choosing a more natural diet comprised of whole foods. My fiance has been following Silverstone's Superhero plan almost exclusively, while I tend to fall of the path fairly often (no surprise there, considering my love for vegan baking). I do my best to stick with it, especially for meals we eat together.

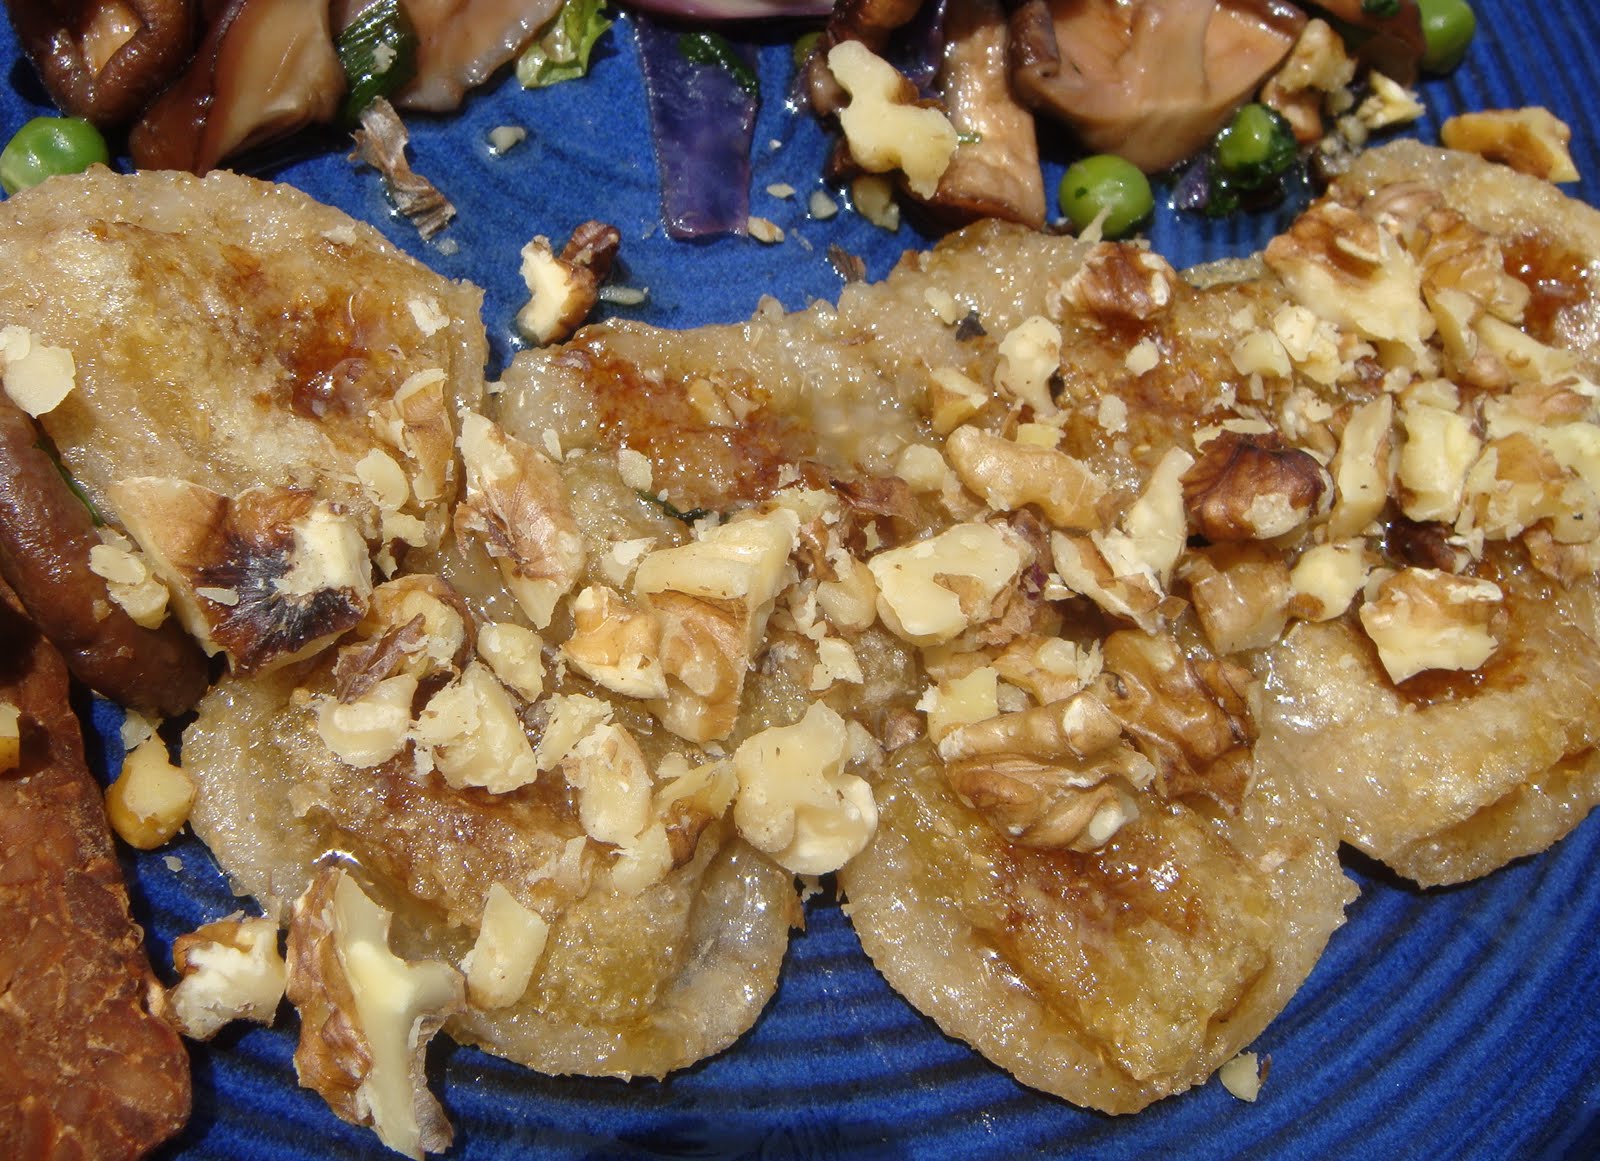
On weekends, we all like to have a nice treat for breakfast. Unfortunately, pancakes aren't exactly "Superhero." Lucky for us, Miss Silverstone has provided us with a delicious (however unexpected) alternative: mochi! I had never heard of mochi before reading The Kind Diet. Silverstone uses it in two recipes: Pan-Fried Mochi and Mochi Waffles. Due to my lack of ownership of a waffle iron (wedding registry, here we come!), I'm left to enjoy just the first recipe, and boy do I enjoy it! My fiance and I have been making mochi almost every weekend, and it is so very delicious. Below is the way we like to make it, served with a yummy side of stir fried veggies and greens, and some tempeh bacon.


Sunday Morning Mochi with Stir-Fried Veggies

INGREDIENTS:

For the Mochi:

1 package mochi, cut into squares
1-2 tbsp oil (olive or safflower both work well)
1 tbsp tamari or soy sauce
1/4 cup brown rice syrup or agave nectar
1/2 cup walnuts, chopped

For the Stir Fry:

1 tbsp olive oil
2 tbsp mirin (rice wine)
2 tbsp tamari or soy sauce
1 tsp umeboshi vinegar

PLUS:

Whatever veggies you want/have in the fridge!
I used:
2 cups shiitake mushrooms, sliced
1 daikon, sliced
1 cup frozen peas
3 scallions, chopped
1 cup purple cabbage, chopped
2 cloves garlic, chopped
1 cup parsley, chopped
2 cups mixed greens


DIRECTIONS:

Begin by preheating a skillet (one with a lid) for the mochi over a medium-low flame. Add the oil. When the oil has heated, carefully place the mochi pieces in the skillet so that they're not touching. As they get bigger, it will probably be impossible to keep them from sticking together, but do your best. Cover with the lid and maintain the heat at medium low.


While the mochi is cooking, heat the oil for the stir fry in a separate skillet. Once it's heated, start adding vegetables in order of how long each takes to cook. I started with the mushrooms and garlic. Once they became tender, add the daikon. After a few minutes, when any liquids produced by the vegetables have cooked off, add the mirin (just like deglazing with regular wine). When most of the mirin cooks off, add the peas and scallions, and cook until heated through.


At some point during the stir-fry, you'll notice that the mochi has puffed up and is beginning to brown on the bottom. Carefully flip each piece, doing your best to keep them from touching. They'll be quite sticky! Once you've flipped them, use a pastry brush to add several drops of tamari to each piece. Do this carefully to keep the sauce from burning in the oil. Re-cover the skillet and allow the bottom of each piece to brown.


To finish off your stir fry, add the purple cabbage until it has just wilted. I overcooked mine a bit in these pictures, so try to keep it from turning a dull purple. It's best when you retain a little crunch and that vibrant reddish-purple! Once the cabbage has wilted, turn off the heat and stir in the parsley. Serve on top of the greens.

When the mochi have browned on both sides, remove them from the heat and plate them. Drizzle with syrup, and sprinkle the walnuts on top.


This dish is a fun, healthy alternative to the common Sunday brunch. I hope you find it as delicious and satisfying as I do!

Monday, April 26, 2010

Clean-Out-The-Fridge Soup

We all know what it's like. Having a fridge stuffed with weird leftovers and things that don't quite make a full meal can be frustrating. I'm actually pretty sure that this is how soup came to be in the first place. If it's not suitable as a meal on its own, toss it into a pot with anything else you can find, and voila! You've got a delicious mish-mash of flavors and a satisfied, full belly.

Last night, I found myself stuck as to what to make. So, I looked to Lauren Ulm's Vegan Yum Yum for inspiration. Here, I found a few recipes for soup, and decided to use her knowledge to create a "clean out the fridge" soup of my own. The final product was mainly based on her recipe for Vegetable Soup. The point, though, is that you don't actually need to follow a recipe to make a good soup. Just use what you have and go with it. As long as you use good judgment with your seasonings (let your nose be your guide), you will most likely wind up with a pretty tasty concoction. I did, anyway.


Clean-Out-The-Fridge Soup

INGREDIENTS:

1 tbsp olive oil
1 small to medium onion, chopped
4 cloves garlic, sliced or chopped
2 cups chopped mushrooms of your choice (I used shiitake)
2 sprigs fresh rosemary, coarsely chopped
1 tsp dried oregano
1 tsp dried basil
6 cups water
2 bouillon cubes
1/4 cup tomato paste
1 cup frozen corn
1 cup pasta (I used rice pasta, but use whatever you have)
1 can cannellini beans, drained
1 tsp salt, or more to taste
Freshly ground pepper to taste
3 cups baby arugula

DIRECTIONS:

Begin by heating the oil in a large pot. Add the onions, and saute them until they start to become translucent. Toss in the garlic, mushrooms, and herbs. Cook until the mushrooms soften and the herbs become fragrant, about 3 to 4 minutes.

Add the water, bouillon cubes, and tomato paste, and stir until the tomato paste has dissolved. Bring to a boil. Add the corn and pasta, bring back to a boil, then let it simmer for about 10 minutes. Then, add the beans and stir until they're heated through. Once the soup has come to a boil once again, season with salt and pepper. Just before serving, stir in the arugula until it has just wilted.


This is a great weeknight meal that will provide some leftovers for lunch the next day. It's good reheated, too! My fiance likes it because it's well rounded and has a good range of vitamins and other essentials. I like it because it tastes good. It's a win-win!

Thursday, January 21, 2010

Chocolate Truffles For Your Vegan Valentine

Looking for something deliciously decadent to give your Valentine this year? Well, a good place to start is with these rich homemade chocolate truffles! They're a very basic recipe, and are super-simple to make, but they sure don't skimp on taste. I made them for the folks here at work and was quite pleased with my results. I veganized this recipe from the Martha Stewart Living February 2010 issue.


So, without further chatter, I give you:

Valentine Chocolate Truffles

INGREDIENTS:
8 oz. bittersweet vegan chocolate, in morsels or chopped
1/2 cup Silk Vanilla Coffee Creamer
1 tbsp. Grand Marnier or other liqueur
1/4 tsp. salt
unsweetened cocoa powder, for rolling the truffles


DIRECTIONS:

Place the chocolate bits in a bowl. Bring cream, Grand Marnier, and salt to a simmer in a small saucepan. Pour the mixture over the chocolate, and let it stand for about two minutes. Then, whisk it until smooth and velvety.

Next, pour the chocolate into a small-ish baking dish (I used an 8-inch cake pan) and refrigerate until it's chilly. I'd recommend about an hour or so.

Finally, scoop balls of the chocolate mixture using a tablespoon and roll them in the cocoa powder, tossing until fully coated. My mixture was a little warmer than I'd like (I only chilled the mix for 30 minutes), so my hands wound up covered in chocolate when I tried to make these into perfect little balls. But, do what you need to do to get the job done. You may wind up with chocolate covered hands, but really, that's not so bad.

They're best when they're a little bit chilly, so keep them in the fridge until you're ready to serve or gift them.


A note about the chocolate choice: I used Ghirardelli chips that were 70% cacao. The chips were really rich tasting, so my truffles turned out really, really rich tasting. Think of it as making an even more concentrated flavor than what you started with. So, if you choose something lighter, you'll wind up with a more delicate flavor, if you choose something darker, you'll wind up with a more robust flavor. Just to keep in mind!

Happy (early) Valentine's Day!

Monday, January 18, 2010

Vegan Bake Sale for Haiti in Los Angeles

Hello Friends!

Sorry for the long absence. Unfortunately, one thing after another occurred back in October, including TWO bouts of the flu, and I just lost track of things! But fear not, I'm back. It's a new year, and I've got fresh eyes. And, of course, I'm ready to delve in to some vegan cooking.

One of the first things on the to-do list this year is to get involved more, and next Sunday's Vegan Bake Sale for Haiti at Locali in LA is the prefect place to start. On January 31, 2010, Locali will be hosting an awesome bake sale benefiting Doctors Without Borders. So if you're in the area, come by to sample some delicious goodies for a wonderful cause. Boyfriend and I will be there representing Augusta Vegan Bakery (my Etsy bakery) ready to sell and sample some yummy animal-free treats.


We hope to see you there!

Locali
5825 Franklin Avenue
Los Angeles, CA

To find a Bake Sale in your area, please visit the Post Punk Kitchen blog here.

Thursday, October 15, 2009

Vegan Month of Food: Vegan Cheesy Mushroom Risotto

I know I've been writing alot about Daiya vegan cheese lately, but I had to share this delicious creation with you, too. In case you needed further proof that Daiya is awesome.

So boyfriend and I, like most of the country, are trying to cut back and save some money. This means more "pantry meals," and fewer extravagant vegan feasts. Luckily, by adding a few fresh ingredients to the inexpensive pantry stuff, I've learned to cook up some pretty tasty grub. This week, we decided to use up some of the Aborio rice by making a risotto. I made it special by adding fresh mushrooms, fresh arugula, and some Daiya that had been sitting in the fridge. It made a delicious, gooey, and warm dish that filled our tummies to capacity. So good!


So here's what I did.

INGREDIENTS:
1 cup arborio rice
4 cups vegetable broth
2 cups sliced mushrooms
2 tbsp chopped onion
1/4 cup Earth Balance
2 cloves garlic, minced
1/2 white wine
1/4 cup soy milk
1 cup Daiya
Salt & Pepper to taste
2 cups fresh arugula (optional)

Start by melting your Earth Balance in a large pan over medium heat. Once it's melted, add your onion, garlic, mushrooms, and rice. Continue heating and stir frequently for about two minutes, and be sure everything has been coated with the Earth Balance. Deglaze the pan with the wine and use your spoon to scrape up the good bits at the bottom of the pan.

With the lid off, add the vegetable broth and the soy milk, and mix well. Allow the mixture to simmer over medium-low heat until the liquid has completely absorbed, about 25-30 minutes. Keep a close eye on it, and stir it often. Once the liquid has absorbed, stir in the Daiya, and add salt and pepper to taste. Daiya is pretty salty, so be sure to season after adding it. Better safe than sorry! Remove from heat. Finally, gently stir in the arugula until it has slightly wilted. Serve and enjoy!

If you ask me the arugula brings a really interesting flavor and bite to the dish that's really tasty. Granted, it's sort of unheard of to wilt greens into a risotto, but whatever. I'm living dangerously.

So, this may not be the epitome of a "pantry meal" in everyone's mind, but it is for me. I pretty much always have these ingredients on hand because they're versatile and are great to turn to when you want to whip up a good meal on the fly. This dish turned out to be a lot of fun, super satisfying, and very delicious. And best of all, it was easy on my wallet! Perfect for a chilly day during a recession!

Enjoy!

Monday, October 12, 2009

Vegan Month of Food: Meals By Genet

For vegans, eating in restaurants can be tricky. I'm lucky enough to live in Los Angeles, where there's a good number of vegan restaurants to choose from when my tummy rumbles. But I have a lot of omnivorous friends, and when we choose to dine together, part of me always worries a little bit. It's on occasions like last night, when vegan boyfriend and I dined with omnivorous friends, that I am very grateful for a very-vegan-friendly restaurant like Meals By Genet.


Meals By Genet, a well-reviewed Ethiopian restaurant nestled in the heart of Little Ethiopia in Los Angeles, is the place that introduced me to Ethiopian Cuisine. And boy am I grateful. If you're not familiar (and don't worry if you're not, this type of cuisine isn't too common in the United States), Ethiopian cuisine is mainly made up of vegetable and meat dishes served on top of Injera; a large, spongy sourdough flatbread that's not too far off from a pita. Lucky for me, an amazing amount of these dishes are vegan, and if they're not, they can easily be altered. The staff at Meals By Genet was more than happy to oblige us by veganizing our tofu dish (it is normally made with Ethiopian butter).


So basically, here's how it works. You get a huge plate that is topped with a piece of that delicious sourdough-like Injera bread, that is then layered with all kinds of delicious veggie concotions in a circle around the perimeter. In the center is your main dish (in our case, tofu, in our friends' case, a meat dish). You're each provided another piece of Injera that you then use in place of your utensils. Just rip off a piece and scoop! Boyfriend and I ate off the same plate, and it was outrageously yummy. What's fun, too, is that when you're done with your piece of Injera, you can eat the one that is on the plate. It soaks up all the delicious juices from the food and is extremely flavorful. Below is a photo of Genet, the chef, holding one of her meals.


So I think we've learned a nice little lesson here. When choosing a place to dine with your omnivorous friends, think out of the box. It's been my experience that ethnic cuisines are often "VVF" (very-vegan-friendly, it's an official term now, k?) and can be a lot of fun for everyone. Just be sure to call beforehand so you're not left eating dry lettuce leaves. We've all been there, right? Oh, and next time you're in L.A., hit up Little Ethiopia. Next week, boyfriend and I are hoping to go to Rahel, a completely vegan Ethiopian restaurant! I'll be sure to report back. But for now, grab that friendly omnivore you've been meaning to eat with and head down to Meals By Genet. You won't regret it!

Meals By Genet
1053 S Fairfax Ave
Los Angeles, CA 90019-4402
(323) 938-9304
www.mealsbygenet.com

photos courtesy Meals By Genet website.

Friday, October 9, 2009

Vegan Month of Food: Mac n' Daiya!

Ah, Mac n' Cheese. Ooey gooey warm and delicious, and SO not vegan... until now! Daiya, my newest vegan cheese obsession, helped me to make an absolutely delightful mac n' daiya cheese casserole that could have fooled an omnivore! In fact, my three guests for the mac n' daiya extravaganza were not vegan at all, but all three wholeheartedly approved of the dish. See the lovely tasters below.


Every Tuesday, my girls (from left: Ruby, Sierra, and Estefania) and I get together to share a meal. I look forward to this night every week, mainly because it gives us all a chance to catch up on a regular basis. It also provides me with a perfect opportunity to cook something I normally wouldn't make, and to share it with my friends. See: huge dish of mac n' daiya.


Now, I'm not going to claim credit for the recipe, this was a creation of a fabulous food blog called To Live and Eat in LA. To my delight, the recipe was easy to follow and turned out spectacularly. I made the recipe a little larger, about 1 1/2 cups to every cup. It was super simple, and really quite delicious. Boyfriend Mack and I even heated it up the next day to spectacular results. Here's a close up of the ooey gooey goodness.


Also pictured is Sierra's Salad (delicious spinach with cherries and walnuts), Estefania's Tofu (ok, she was running late this week, it was store-bought. Still delicious!), and Ruby's Mashed Sweet Potatoes. All together, a wonderful collaboration as usual!

Thanks to To Live and Eat in LA. I highly suggest you check out the blog ASAP if you haven't already!

Have a good weekend!

Tuesday, October 6, 2009

Vegan Month of Food: Easy "Meat"ball Subs

Over the weekend, Mack and I did some major shopping around town (we just moved, and needed some stuff), and since we live in L.A., this means we also logged some serious car time. This, of course, can lead to strange conversations while sitting in traffic. Among other things, Mack and I learned that before going vegan we both had a serious appreciation for meatball subs with provolone cheese melted on top. As you may be able to guess, I was immediately inspired to veganize this old favorite of ours.

And so! Last night's dinner was ooey-gooey cheesy saucey vegan goodness on a bun. And all kinds of simple!

This meal was so easy to throw together, I'm not sure you can call it a recipe. I started by grabbing some Whole Kitchen Vegan Meatballs from Whole Foods, which I heated up in a sauce pan with some plain old jarred pasta sauce. Just use enough to cover the meatballs in sauce. While that's heating up, slice open some soft sandwich rolls, and heat your oven to 350 degrees. When the sauce and meatballs are simmering, spoon the desired amount of meatballs into the rolls. Then cover with your favorite vegan cheese. I used Daiya, which I am obsessed with. It's available pre-shredded at Whole Foods.


Place the sandwiches on a baking sheet and place in the oven for about ten to fifteen minutes, or until the cheese has completely melted. Keep an eye on the bread, too, because depending on which type you choose, it may get too crispy.


Obviously, vegan cheeses won't melt the same way dairy cheeses will, so be sure to look closely- your cheese may not look completely melted, but it may be ready to eat. Burning is a possibility as well, so make sure not to over cook. The Daiya on our sandwiches was gooey and melty in the center, even if it may not seem that way in the photo.

These sandwiches were absolutely delicious, and proved (once again) that just about anything can be made vegan. Also, you can whip them up in less than 30 minutes. Perfect for a work or school night!

Enjoy!

Monday, October 5, 2009

Vegan Month of Food: Icepan Adventures!

Happy Vegan Month of Food! I'll say, I've always loved October, but now that it's Vegan MoFo, I love it even more.

Since it still feels mostly like summer here in Los Angeles, I decided to use my lunch break on a chilly treat: vegan ice cream! After reading about Icepan on quarrygirl.com, I knew I had to check it out; it's just a few blocks from my office! I was not disappointed.


Icepan offers ten different flavors, each of which can be made with one of four kinds of milk: whole, low-fat, non-fat, and soy (hooray!). From there, you can add toppings in or on top of the ice cream. What's really cool is that they actually create the ice cream from scratch, right in front of you! Click here to read about their technique.

Being a chocolate freak, I went with chocolate ice cream with walnuts mixed in and Oreos on top. Completely delicious.


The dessert was creamy, chocolatey, and very satisfying to the sweet tooth. It was rich and delicious. Tastes like the real thing! I highly recommend.

If you're in L.A., check them out!
IcePan
7100 Santa Monica Blvd. #135
West Hollywood, CA 90046
Phone: (323) 883-0267
Fax: (323) 883-0726
Hours: 11am - 10pm
11am-11pm Friday & Saturday

Friday, September 18, 2009

Look out, world! VeganMofo is here!


It's tons of Vegan food, ALL MONTH!

That's right, friends, October is upon us. Which, of course, means that the Vegan Month Of Food (aka VeganMofo) is hitting the blogs. If you're unfamiliar, this is where tons of foodie bloogers, vegan and non-vegan, will blog nearly every day about my favorite topic. Expect the web to be overrun with delicious recipes, stories, and food photography (and many, many, words).

This is an exciting month for me for several other reasons, as well. For one, I'm moving in to a brand new apartment with my darling significant other, and am going to be breaking in a brand-new kitchen among other things. Also, one of my very best friends from college will be getting married, so a trip (including the significant other) back home will take place. Also, I'll be ramping up my work on Augusta Vegan Bakery and working hard to get the word out. A lot on my plate. Naturally, I should choose this month to participate, right? Of course. In reality, it means I'll have tons of fresh material to share, and probably will want the occasion to spew about it, every day.

So, as soon as the move is over, La Vie En Vegan is back on track.

Hope to see you then!

For more information on VeganMofo, please visit Kittee's blog, Cake Maker to the Stars.

Wednesday, August 12, 2009

Orange-Glazed Tempeh

ladies and gents!

Hope everyone is having a fine summer. I have been keeping myself very busy with the bakery, but have also managed to find the time to keep cooking. Last night, my neighbor Stef and our friend Katie (or Kate, as I have recently decided to call her) came by my apartment for our traditional Tuesday-night meal. It was lovely, as usual, and full of fun things like girl-talk; and of course, good food. Stef made a fabulous roasted vegetable orzo dish, and I made orange-glazed tempeh with a side of kale (this vegetable is growing on me). Kate brought a fabulous Mexican Chocolate pudding! Sadly, I have no photos of the kale, the pudding or of Stef's dish, but I do have some shots of the tempeh.


My orange-glazed tempeh recipe is really just me getting experimental, so bear with me if the measurements are a little wonky. Yeah, I said it, wonky.

INGREDIENTS:

1 8oz. package tempeh
1 ½ cups orange juice
Zest of one orange
2 tbsp soy sauce
1 ½ tbsp mirin
1 tsp finely grated ginger
2 cloves garlic, smashed and minced
2 tbsp olive oil
1 cup chopped parsley
Salt & pepper to taste

DIRECTIONS:

Set a saucepan full of water on the range to boil. Be sure to salt the water. Meanwhile, cut the tempeh block into small triangles. Seen my tempeh-cutting diagram? Go one triangle further to make the triangles half as large. When the water has reached a boil, toss in the tempeh triangles and let them cook for 3-5 minutes. Using tongs, evacuate them to a colander to drain.


Next, heat the olive oil in a skillet over medium to medium-high heat. Make sure to keep it low enough so the oil doesn’t smoke. Place the drained tempeh into the skillet, arranging it so that each piece lies flat. Be careful here, as the wet tempeh may cause the oil to spit and burn your delicate little hands. Don’t disturb them for about five minutes or until they are golden brown.

Meanwhile, in a small bowl, whisk together your remaining wet ingredients: the orange juice, soy sauce, mirin, ginger, garlic, and orange zest. Season it to taste with salt and pepper.


Flip the tempeh triangles when the five minutes is up so that the other side may brown. Allow them to cook for five more minutes, then pour in the sauce mixture. Allow the sauce and tempeh to simmer for about 7 to 8 minutes, then remove the tempeh onto a plate using your tongs. Reduce heat to low, and stir the parsley into your sauce. Spoon remaining sauce onto your tempeh and serve. Yum!


This didn’t produce the thickest of all sauces for me, but I imagine if it’s monitored very closely, you could get a very satisfying glaze. You know how it is on girls night… Chit-chat leads me to pay less attention to my dish. Nevertheless, we all enjoyed it thoroughly, and the sauce went fabulously with the kale. A winner, over all!

Thursday, July 30, 2009

Augusta Vegan Bakery

ANNOUNCING!

It's the official launch of Augusta Vegan Bakery, my own personal bakery on Etsy. How convenient is that? Now you can order cookies and other various delicious items and have them sent to your own home!

Check out the site here.

<3

Thursday, July 16, 2009

gwen's amazing taboulleh

Happy July!

Sorry for the long wait, it's been a very busy July, filled with food, friends, & fun. Three f-words that are fantastic, not foul. While there were many recipes to choose from to blog about, I've decided to begin with a taboulleh recipe that my dearest foodie-friend Gwen was kind enough to share with me. It's one of my absolute favorite foods in the world, and Gwen's is simply the best I've had.

I've made it twice so far this month, first with a spread of Middle Eastern food for my friends Estefania and Ruby, and second after a trip to the farmer's market on Ivar between Hollywood and Vine with Mack. The herbs and heirloom tomatoes were calling to me to make the dish again. I'll share some photos from both!


INGREDIENTS:
1 cup cracked bulghur wheat
2 1/4 cups boiling water
1/3 cup lemon juice, or three lemons' worth
1/3 cup extra virgin olive oil: something tasty, not the cheap stuff- you'll taste the difference!
2 bunches Italian flat-leaf parsley, chopped
1 bunch mint, chopped
1 bunch scallions, white and green parts, thinly sliced
1 pint of grape tomatoes, quartered, or equivalent amount of your favorite type of tomato
1 tsp salt
1/2 tsp cracked pepper
**got tomatoes that aren't quite ripe? include 1/2 tsp of sugar.

Pour the boiling water over the bulghur in a large bowl, and cover tightly with saran wrap. Let stand one hour, then drain any remaining water and fluff it up with a fork.

Meanwhile, in a smaller bowl, whisk together the lemon juice, olive oil, salt, pepper, and sugar if you're using it. Set aside.

Next, mix the bulghur, parsley, mint, and tomatoes. Add the lemon and olive oil mixture to taste. And, per Gwen's exact instructions: EAT.


The girls and I enjoyed this dish along side homemade hummus and falafel, and it went swimmingly. Well, the combination of flavors went swimmingly, but the falafel wasn't quite perfect. It sort of fell apart. But the flavor was great! No matter, there's time for improvement.


Mack and I enjoyed the taboulleh along side a bean salad and corn on the cob. The heirloom tomatoes that I picked up at the farmer's market really added some unique color and pizazz to the dish. Check out the many colors inside the red heirloom in the picture below! Goregous.


The fresh flavors, though not traditionally paired, went quite well together. It really felt like summer. Nothing like a no-cook dish to cool you off on a hot day! Pair it with some iced tea and you're good to go.

Get out there and enjoy the flavors of summer!

Tuesday, June 23, 2009

Classic Gazpacho

Happy Summer!

Sorry for the long absence, but I have officially moved and am all settled in. And now that I'm comfortable in my new kitchen, it's time for some cool summer dishes. I've been craving cold salads and soups, anything with tons of fresh vegetables and grains. Hence, the creation of a classic gazpacho.

Though we traditionally see gazpacho as a Spanish dish, its roots are Arab in origin, arriving in Spain with the Moors. Once in Spain, it became a staple part of Andalusian cuisine. The original Moorish dish was very different from what we call gazpacho today, comprising mainly of bread, water, olive oil, and garlic. It is supposed that vinegar was introduced to the mix by the Romans, and tomato was not added until the dish spread through the rest of Europe in the mid-thirteenth century. It gained popularity during the summer months, especially with farmers and field hands, who could make the soup with available ingredients and used it to cool off in the hot weather.

Today, gazpacho is widely consumed in Spain, Portugal, and parts of Latin America. It is gaining a presence in other parts of the world, where many modern variations are created including such ingredients as watermelon, grapes, vegetable stock, and seafood. In fact, the term "gazpacho" has become a generic term for almost any cold soup.

Due to its versatility, this dish is beyond simple to veganize. In fact, many recipes are vegan already, and need no alteration. I recommend using this recipe as a base and letting your creative side run wild. You can eyeball the measurements here, and adjust the ingredients to taste. I didn't use a measuring device or a recipe when I made this. I just put in what I thought would be nice, and I wound up with a filling, chilly, and tangy soup. Have fun with it!


INGREDIENTS:
2 cups cherry tomatoes, quartered
1 large ripe tomato, diced
1/2 medium red onion, diced
1/2 medium cucumber, diced
3 scallions, chopped
3 cloves garlic, minced
2 avocados, diced
1/4 cup chopped cilantro
1/2 to 1 tsp chili powder
juice of 2 limes
1/4 cup vegetable broth
4 cups tomato juice
salt and pepper to taste

Ready? Easiest preparation ever: combine all vegetables in a bowl or pitcher. Cover with lime juice, tomato juice, and vegetable broth. Finally, add salt, pepper, and chili powder. Mix gently. If your liquids are cold, you may serve immediately, but this soup does well with at least an hour of chilling time in the fridge.


I served it with some sprouts on top, and a sprig of cilantro.

Just a note on my choice of veggies: I am not the biggest fan of raw bell peppers. Traditionally, you'd have at least one or two of those puppies in here. I omitted them, obviously. Also, avocado is not the most traditional ingredient in the mix, but I think it adds a lot of body and substance to the soup. Makes it feel more like a meal and less like a salady-snack. I was full after a serving!

Enjoy this cool soup outside on a hot sunny day! If you have an ice pack, it would make a great addition to a picnic. Just pack it up in a glass jar, keep it as chilly as possible, and serve in cups. Enjoy!

Thursday, May 14, 2009

Cinco De Mayo Party with Grilled Corn & Tacos!

Aaah, Mexican food. There is nothing more delicious on a hot day than some fresh and delicious salsa, guacamole, or fajitas. It's one of my favorite cuisines when it's done right, so this Cinco de Mayo (which was a while ago, yes I know), I decided to go for it!

Mind you, I did take a shortcut here and there (instead of crafting my own taco "meat" I used Yves'), but it was still delish.


So here was the menu:

Mexican Grilled Corn
Taco bar with:
Tequila-Marinated Portabellas
Sauteed Peppers & Onions
Yves' Taco Filling
"Crema"

To begin, I started with the Tequila-Marinated Portabellas:

INGREDIENTS:
3-4 large portabella mushroom caps, sliced
3/4 cup tequila
juice of 2 limes
2 cloves garlic, pressed and chopped
salt
freshly ground pepper

In a shallow dish, combine the tequila, lime juice, garlic, salt and pepper. Whisk them together with a fork until it's well combined. Unless you want to get a little tipsy, I'd recommend tasting this marinade just once or twice when you're adjusting the salt and pepper to taste. Add the portabella slices, and toss to coat. Spread them evenly throughout the pan, then let them stand and marinate for about an hour.

When your hour is up, it's time to grill these babies! Place each slice on either a preheated grill or grill pan, and cook until nice grill marks form. Depending on your grill, this could take anywhere from 3 to 8 minutes per side. It's best to serve these immediately, while they're all hot and nummy. Yup, nummy.

Next! Peppers and Onions.

This is the easiest thing ever. EVER! I probably don't have to spell this out for you, but for thoroughness' sake, I will.

INGREDIENTS:
1 beautiful yellow bell pepper
1 lovely red bell pepper
1 gorgeous green bell pepper
1 pretty red onion
4 cloves garlic
2 tbsp olive oil

Slice all the vegetables (except garlic) into thin strips; a uniform cut leads to maximum pretty potential! Mince the garlic. Heat the oil in a sautee pan or skillet. When the oil's hot, throw in all the vegetables and sautee until soft and delicious-looking. The onion should be getting transparent. SERVE!

See? That was laughably easy. Hilarious.

NEXT! Corn.

Ok, so I have a special relationship with corn. My grandpa used to grow it on his farm and every harvest season we would eat TONS of it. I'm an expert picker, shucker, and silker. Oh, and an expert eater. Now I'm working on becoming an expert corn cooker. We would traditionally just boil it and butter it to death, and eat it right off the cob. Yes, this was awesome. My favorite was when grandpa would cut his off the cob (tough to eat it with dentures, you know) and it would come off in big slices. I still get a kick out of that. That's moot, however, because we'll be preparing this on the cob, Mexican-style. AKA slathered with some awesome creamy mess (this usually involves cheese, sour cream, or mayo) and tons of herbs and spices. CRAZY delicious.

INGREDIENTS:
4-5 Ears of corn (or as many as you can eat, whatever you want!!)
Oil for brushing
3/4 cup Vegenaise
juice of 1 lime
extra lime slices for garnish
1/2 cup chopped cilantro
1/4 cup chopped green onions
1 tsp chili powder (or to taste, depending on your spicy-tolerence)
salt (to taste)
freshly ground pepper (to taste)

Shuck and silk (remove as many tiny silks as you can, I'm not sure if this is a real term or something I made up) the corn, and brush with oil to prep.

Combine the Vegenaise, lime juice, cilantro, green onions, and chili powder in a bowl, then season with salt and pepper to taste. It should be slightly tangy and spicy, and most definitely creamy. YUM.

Place the corn on a preheated grill or grill pan, and cook until the kernels begin to brown. Keep turning them so they're evenly cooked. As soon as they're done, evacuate them onto a platter, and slather them with the Vegenaise mixture. Save any extra to use as "crema" for the tacos.


And that's it! The other things are pretty much self-explanatory, you'll need to prep the taco "meat" and the tortillas (I brown them over my gas burners first, they taste AWESOME), and prep any other fixins you like. Pile it all into your tortilla, have an ear of corn on the side, and HAVE A FIESTA!


Que Delicioso!

Wednesday, April 29, 2009

Sauteed Beets with Skordalia and Tempeh

Ah, beets. Unfortunately many people have a fairly strong hatred for this vegetable (my mother, for one), most likely due to the very common canned variety known mainly for its lack of flavor, texture, and fun. Or perhaps people are turned off by the root vegetable's scientific classification: "Beta Vulgaris." Whatever the case may be, it is my opinion that beets have gotten the short end of the stick over the years, and it's about time we re-evaluate this "nutritional powerhouse." Beets are not only gorgeous (they come in a wide range of jewel tones), but they are excellent sources of antioxidants, potassium, and folic acid.

I've been on a beet kick over the past month or so, after quite randomly selecting a recipe from Vegan With A Vengeance that called for the vegetable. To my delight, I found beets to be not only flavorful, but easy to work with (contrary to popular belief). Sure, they turn your hands purple, but that's the fun part! It's like finger painting all over again. And it washes off with soap and water, you for all you worry-warts.

So, when Sierra graciously provided this month's edition of Martha Stewart Living as a pastime for work, I was thrilled to find an entire article on beets! It's like the stars were aligned for me. You can check out the online version of the article here. Included in this article were a handful of yummy-looking recipes to try with beets, and though none were vegan, I decided I had to give it a go. With a few tweaks, the recipe for beets and skordalia was easily vegan-ized.

A note on skordalia: yes, this is an unusual word you've probably never heard. I hadn't come across it before, either, but Wikipedia quickly cleared things up for me. Skordalia is a thick puree that is found in Greek cuisine, usually made from potatoes, garlic, and vinegar. It's a tangy and tart, and is most notably served with beets. Also, I was excited to read that on the Ionian Islands, they make it with lemon instead of vinegar. I think we all know that'll be happening soon.

Anyway, here's your traditional skordalia with beets and tempeh. Hope you enjoy!


INGREDIENTS:

For Skordalia:
1 pound Yukon Gold potatoes, peeled and cut into 1-inch cubes
4 garlic cloves, unpeeled
1/4 cup white-wine vinegar
1/2 cup oil (Martha called for Safflower, which I didn't have, so I went with a combo of olive and vegetable)
1/4 cup white wine
Coarse salt

For Beets:
4-6 (1 pound) mixed beets, scrubbed well and trimmed
2 cups baby lettuce (I used Mache, I highly recommend)
2 tablespoons extra-virgin olive oil
3 garlic cloves, sliced
Coarse salt and freshly ground pepper

For Tempeh:
1 8-ounce package of tempeh, cut into thin triangles
1/4 olive oil
1/2 red wine
1/4 red wine vinegar
1 tsp oregano
2 cloves crushed garlic
Coarse salt and freshly ground pepper

Like Martha did, I'm going to write out the instructions for this recipe in three sections. Read the full instruction set first so you can decide how you'd like to go about tackling all three. None is particularly more difficult than the other, but timing-wise they don't always add up. I did yoga in between boiling sessions- just ask Jenn, it was a hilarious sight.

Skordalia:
Bring potatoes and garlic to a boil in a medium pot of salted water. Reduce heat, and simmer 10 minutes. Do some yoga while you wait. Drain them in a colander, and let 'em cool.
While they're cooling, peel and smash the garlic cloves. Place potatoes, garlic, and vinegar in a food processor and pulse until well blended. Add the oil in a steady stream, then white wine. Continue pulsing until the mixture is smooth. Transfer to a bowl, and season with salt. Cover it all up, and refrigerate until you're ready to use.

Beets:
Bring beets to a boil in a pot of salted water. Reduce heat, and simmer until tender, about 25 minutes. Go do some more yoga. After a while, check out the color of the water. This isn't part of the recipe, it's just awesome how purple it gets! Drain the beets in a colander and let cool. When they're of a touchable temperature, it's time to peel. If you've never worked with beets in this manner, the easiest way to get the peel off is to just apply pressure with your fingers and rub. If your beets have been cooking long enough, the peel will easily remove itself from the inside of the beet. Your hands will get purple, but it's a quick and easy way to peel them. Plus, the purple washes off, so you don't have to look like the one-eyed, one-horned, giant-purple-people-eater at work the next day. Moving on.


Cut the beets into one- to two-inch long pieces. If you've got mini beets, you can do quarters. I could only find the normal sized ones, so I cut them as if I was slicing an orange. Either is fine. Next, heat the olive oil in large saute pan over medium heat. Add your garlic and beets, and cook until the garlic has turned golden brown, about three to five minutes. Finally, add the mache lettuce in handfuls and cook until slightly wilted. Season with salt and pepper, and you're ready to go!


Tempeh:
In a medium saucepan, bring several cups of salted water to a boil. Drop in the tempeh triangles and allow them to simmer for five minutes. Sounds strange, yes, but boiling allows the tempeh to absorb marinade more easily. While the triangles are boiling, assemble the marinade in a shallow pan or casserole dish by whisking together the olive oil, red wine, vinegar, oregano, garlic, salt, and pepper. When the tempeh is ready, evacuate it from the water with tongs, and place it immediately in the marinade. Allow it to rest in the marinade for at least 30 minutes, or up to several hours.

To cook the tempeh, I used a grill pan on high heat. Be sure to prep the pan with some oil (I used organic high-heat canola oil spray) so it doesn't stick. Once you've placed the triangles on the hot pan, don't move the tempeh for several minutes, about five (this depends on how thin or thick your slices are). When the triangles are ready to be flipped, they will release easily from the pan and have lovely grill marks on them. Repeat for the second side, e voila!


To Plate:
Spread the cooled skordalia into a little puddle on the plate. Arrange the tempeh in a pleasing pattern on top, and spoon the beets on the plate to the side. Garnish with dill and coarsely chopped parsley.


And enjoy!

This dish held several unusual and unexpected flavors, but in the end melded together quite harmoniously. For next time, I plan on trying the skordalia Ionian Islands style- made with lemon, rather than vinegar.

Special thanks for Chris for allowing me to cook so experimentally, and for so expertly gaffing these photos.

Enjoy!